Showing posts with label cameo. Show all posts

Sunday, 6 December 2015

Welcome to GINGER and BRAD home. Home sweet home has to be taken literally. Benvenuti alla casa di Ginger e Brad. Casa dolce casa va preso in senso letterale.


We have dear friends that share the joy of the season giving us wonderful cookies and meringues. To honor them this decoration is going to be the centerpiece for the table to welcome our guests this Christmas.
Abbiamo dei cari amici che condividono la gioia delle festività regalandoci dei meravigliosi biscotti e delle fantastiche meringhe, per onorarli questa “dolce” decorazione darà un tocco gioioso alla nostra tavola di Natale.


It is the house of MR Gingerbread Man (Brad) and his wife Ginger, built in a garden where chocolate edges are flowering with lollypops.
Si tratta della casa dell'omino di pandizenzero e signora , posta nel loro giardino dove le siepi di cioccolato fioriscono di lecca lecca.

It is quite easy to build but some pieces as the chocolate edges could be a challenge for bigger hands… but with the help of a ruler even these folds will come out well.
Nell’insieme costruirla è abbastanza semplice, anche se certi pezzi (le siepi di cioccolato) sono un po’ più laboriosi da montare ma con l'aiuto di una righetta per le pieghe tutto si risolve!


We have been thinking of designing a gingerbread house for a long time, we made a real cookies version twentysome years ago and it was a bit crooked but nice. The inspiration came with the balconies that folds out to get their 3d shape, they are the difficult part of the project , but the fun part to design and assemble. From there it was easy with cookies, waffles, butter dough, candies and chocolate bars to help.
We like a lot designing the outdoor of our 3d houses and the chocolate bars holding the lollipops are a sweet detail!
Era da tanto tempo che volevamo fare una casetta di pandizenzero, anche in ricordo di quella di biscotti vera, un po' storta, che avevamo fatto un anno per Natale più di venti anni fa, ma mancava l'ispirazione. Che è venuta con I poggioli che si piegano e si costruiscono in poche mosse, sono la parte più complicata della casa , ma anche la più divertente da montare...di lì a fare tutto poi non c'è voluto molto con biscotti, glassa, waffles, pasta frolla, caramelle e cioccolata a fare da aiutanti . Ci piace anche inventare i giardini dei nostri progetti e un dettaglio laborioso che ci piace tanto sono le siepi di tavoletta di cioccolato in cui infilare i lecca lecca.


 “The Making of”


This pictures shows how balcony gets his 3d shape with few folds and a dot of glue, before being attached to the structure of the houses.
Queste foto mostrano come si costruiscono i poggioli con poche pieghe e un goccio di colla prima di attaccare le decorazioni di facciata alla struttura.


Here you can see green house at the back getting its shape and being attached to the facade .
Qui si vede la serra sul retro che prende forma e viene attaccata alla casa.


This is how to build the roof: cookies ,cookies and cookies then some candies.Just be careful with the alignment of the two dormers that will have to “meet” the side walls. Under the roof two triangles of cardboard like beams help the roof to keep its shape.
Così si costruisce il tetto: biscotti poi biscotti e ancora biscotti poi un tocco di caramelle. Solo bisogna fare attenzione agli abbaini che andranno a incontrare i muri laterali. Sotto il tetto due triangoli di cartone come capriate aiutano il tetto a tenere la sua forma.


This is the details of the inside, a box accomodates and hides the side of the tea light.
Il dettaglio dell'interno. Una scatola contiene e nasconde la tea light.


Datails of the Chocolate edge preparation. First of all fold neatly the top part, then the little frames on top of it. Just before closing the edge insert the strip with holes to hold the loppypops straight.
Dettagli della costruzione della siepe di cioccolato. Prima di tutto piegare bene la parte superiore e su questa incollare le “cornici”. Appena prima di chiudere il tutto inserire la striscia bucata che aiuterà a mantenere i lecca lecca in posizione verticale.


Con questo progetto partecipo all'ispirazione del mese di scrappiamo insieme


Saturday, 29 November 2014

The Making of: I will be home for Christmas. Il ”Making of”: sarò a casa per Natale


Roma non è stata fatta in un giorno, questo è quello che mio fratello dice sempre quando gli faccio fretta. Da queste immagini potrete vedere che un po’ è vero…


Every time I ask my brother to be faster with his part of one project he always answers that Rome was not built in one day. From these pictures you will see that sometimes it is true.


Qui c’è la facciata che prende forma con le sue decorazioni. 
Here you can see the façade being shaped and assembled with its decorations.


Qui alcuni dettagli dei confini del giardino.
Here some of the details of the garden border.


Qui alcuni dettagli del parco sul retro.
The details of the back garden.


Immagini dell’albero di Natale in giardino: piatto(!), assemblato di fianco agli altri pezzi, il dettaglio della colla sulla tea light, l’albero inserito nel suo vasone.
Images of Christmas tree  gardening: flat(!), assembled side by side with the other parts, the glue on top of the tea light, the tree inside its huge vase !


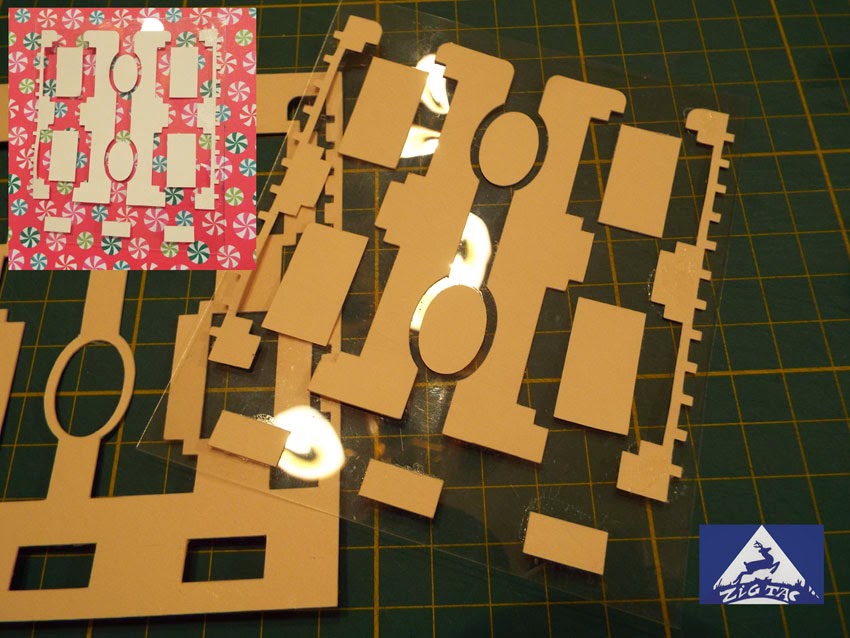
Per scegliere con più facilità la carta per le decorazioni il trucco è fare una mascherina in acetato con gli avanzi : questo aiuta a vedere se le dimensioni e colori della fantasia scelta si adattano o meno.
To choose well the paper for the decoration the trick is to prepare a mask with leftovers glued on acetate to verify if the dimension of the design of our paper works well. 


Un tetto appiattito con i suoi ringhierini e poi pieno di caramelle!
The roof flat with the railings and then built up and full of candies!


Affinché  possa sostenere il peso delle caramelle e cioccolatini noi consigliamo per la struttura l’uso di cartoncino 270 g/m2. 
To be able to sustain the weight of candies and chocolates the cardstock for the structures should be  270 grams x square meter.


Monday, 2 June 2014

A pop up invitation card. Un invito pop up


This is the invitation card  we want to use for our friends this summer. Here you can see it from  the first project idea to the finished prototype. The inspiration came from the pop up card that became popular at the Universal Expositions  in the XIX century .


Questo è , dall’idea alla realizzazione, l’invito pop up che vorrei  usare per gli amici questa estate.L’idea viene da quelli storici già popolari ai tempi delle prime esposizioni universali…quelle del Cristal palace e della torre Eiffel, per intenderci.


The first drawing was made with felt pens, one different color for every layer.
 Il disegno iniziale a pennarello individua con un colore diverso ogni livello del pop up.


The  different layers were drawn  with a ball pen and colored with water colors.
The drawings were scanned and the jpeg file inserted in the cutting program of my plotter to get our curtains ( I am thinking of a paper theatre now…The Merchant of Venice??).

Il disegno è stato poi eseguito a biro e colorato con gli acquerelli.
Scansito e elaborato nel programma di taglio  del plotter per ottenere le tre “quinte” e il fondale ( sto pensando a dei teatrini adesso…Il mercante di Venezia??)


And here we go, ready to flatten the card in the envelope and mail it for a pop up effect !!! 
E voilà pronti ad entrare piatto nella busta e uscire in tre D !!!


Con questo lavoro partecipo a questi challenge:
Creando con Amore Fiori: challenge di maggio
Scrappiamo insieme Challenge #1/14 A special card

Sunday, 8 September 2013

Free download. Cut your seed box - Scarica la tua scatola per sementi


Seeds collection time ! We created a box to keep the seeds to give to a friend. Use the link to download the studio file to cut it with your Cameo. We put only the flowers, you personalize it as you like.  


Tempo di raccolta di semi! Abbiamo creato una scatola per conservarli da regalare ad una amica. Col link potete scaricare il modello  in formato .studio da personalizzare e da tagliare con la vostra Cameo.
 
  
Please leave a comment if you dowload the project.

Per favore lascia un commento se scarichi questo progetto.